
Are ya'll ready to have some fun with me today ? Ok, step 1 - if your like me you have a bin of 2 inch strips ( if not you'll need to cut a bunch) Here I randomly pair 2 in strips from my Civil War collection and sewed them together.
Step 2 - press them open , pressing towards the darker of the two fabrics.
Step 3 - Sub cut you strip sets into 2 inch slices and pair them as these will be little four patches.
Step 4 - chain piece all your little 4 patch units :)
Step 5 - Press all your 4 patches open

Step 6 - Pick out 2 colours of fabric and cut 6 3 7/8 squares from Each fabric. Now sub cut these squares on the diagonal .

Step 7 - Pair 1 of Each fabric and sew together, press open and cut off the little bunny ears :)

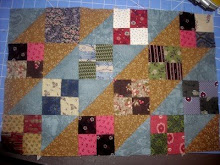
Step 8 - Layout as seen above. Be careful of how you place the 1/2 squares otherwise it won't look right :)

Step 9 - Sew together in rows and you have a wonderful little mini quilt. Now you can add boders to this to make it a bit larger if you like but me I like it this way so tomorow I will be quilting it and adding the binding :) Hope you have enjoyed this tutorial and please if you make one comment on this post with a link to the picture as I'd love to see yours !!


3 comments:
That was way too cool!
Thank you for the tutorial.
This is great! I love the tutorial and it is beautiful.;)
What a great tutorial I hope I can remember it
Thanks Darlene
Post a Comment